Bread
I've had a hard time finding a bread recipe that works well. The boys and I made some awesome bread for our celebration for the Spring feasts, but I didn't save the link! I've been through several that didn't work for me so I'm making sure to document the one that turned out well.
INGREDIENTS
- 2 ¼ cups warm water
- 2 tablespoons sugar
- 1 tablespoon instant or active dry yeast
- ¾ tablespoon salt (see note)
- 2 tablespoons olive oil, canola oil, vegetable oil or avocado oil
- 5 ½ – 6 cups (781 – 852 g) all-purpose flour or bread flour (see note)
INSTRUCTIONS
- In the bowl of an electric stand mixer fitted with the dough hook, combine the water sugar and yeast. If using active dry yeast, let the mixture bubble and foam before proceeding (this can take 3-5 minutes). If using instant yeast, proceed with the recipe (no need to let the yeast activate).
- Add the salt, oil and 3 cups of flour and mix. Add in 2 1/2 to 3 more cups of flour gradually. The dough should clear the sides of the bowl and form a soft ball that doesn’t leave a lot of dough residue on your fingers. Knead for 2-3 minutes until the dough is smooth. If the dough starts to cling to the sides of the bowl (or the center column if using a Bosch or other mixer with a center), add 1/4 cup of flour at a time until a sturdy but soft ball of dough forms.
- Rising Method 1: Leave the dough in the mixer, cover with a lid or towel, and let the dough rest for 10 minutes. Stir it down by turning on the mixer for 10 seconds or so. Repeat the "rest and stir down" cycle five more times.
- Rising Method 2: Instead of letting the dough rest for 10 minute spurts and then stirring it down, transfer the dough to a lightly greased bowl and cover with a towel or greased plastic wrap. Let the dough rise until doubled, about an hour or so, depending on the warmth of your kitchen.
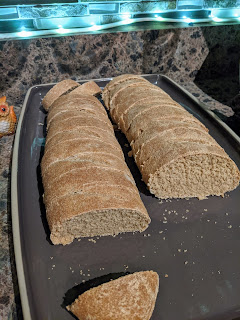
- Turn the dough onto a lightly greased surface and divide in half. Pat each section into a thick rectangle, 9X13-inches or thereabouts (doesn’t have to be exact). Roll the dough up starting from the long edge, pressing out any air bubbles or seams with the heel of your hand, and pinch the edge to seal. Arrange seam side down on a large baking sheet lined with parchment paper (I use separate baking sheets for each loaf). You can slash several gashes in the top of the bread now or wait until after it has risen (to avoid the risk of the bread deflating, especially if you don’t have a very sharp razor or knife, slash now – see pictures above in the post for a visual).
- Cover with greased plastic wrap or a kitchen towel, and let the loaves rise until noticeably puffy and nearly doubled in size, about an hour.
- Preheat the oven to 375 degrees F and make sure an oven rack is in the center position. If you haven’t already, with a very sharp knife or baker’s lame cut several gashes at an angle on the top of each loaf (see pictures above in the post for a visual).
- Optional: Place the baking sheet in the hot oven and immediately toss 3-4 ice cubes on the bottom of the oven (this gives a delicious, classic, French bread crispness to the crust). Close the oven door quickly.
- Bake for 25-30 minutes until golden and baked through. Remove from the oven and slather with melted butter (optional, but delicious). Repeat with the 2nd loaf (or if you have convection setting, the loaves can bake at the same time, just rotate the baking sheets halfway through baking).
NOTES
Ice: consult your oven’s manual for details or caution on putting ice/water on the bottom of the oven floor – I’ve never had a problem, but everyone should do their own research and use their own best judgment (also take care not to toss the ice cubes on the glass oven door as it could crack). Flour: as with all yeast doughs, I never use the flour amount called for in the recipe as a hard fast rule (unless a weight measure is given and then I pull out my kitchen scale). Because humidity, temperature, altitude and a multitude of other factors can impact how much flour you need in your yeast doughs, I always judge when to quit adding flour by the texture and look and feel of the dough rather than how much flour I’ve added compared to the recipe. This tutorial on yeast may help identify how a perfectly floured dough should be.Whole Wheat Flour: also, I often use half to 3/4 finely ground white whole wheat flour with good results – and sometimes I get crazy and use 100% whole wheat flour (always finely ground white wheat) but the bread is a bit more dense with 100% whole wheat flour. If using part or all whole wheat flour, add a few minutes to the kneading time to help develop the gluten (adding a couple tablespoons of gluten flour can also help the whole wheat bread bake up light and fluffy).The Original Recipe: called for 1 tablespoon salt; over the years I’ve decreased that amount just slightly but you can use the full amount. If you don’t have an electric mixer, this dough can be made by hand using a large bowl and a wooden spoon the good old-fashioned way!


Comments
Post a Comment